START HERE
Install Skiff
- The Skiff installer runs in the browser: connect the FM-1 by USB and follow it. It takes about two minutes and the FM-1 restarts on Skiff.
- No Chrome or Edge? With Python 3,
tools/fm1_install.pyfrom the repository installs the release's.fwscfile. - Later releases install the same way. Holding OCT− and OCT+ together for five seconds puts the unit in update mode.
- The same page takes the FM-1 back to the official V15 firmware, saving a complete backup of your music first.
Video and step-by-step coming
START HERE
Find your way around
-
HOME
HOME is the page with all six tracks, a lane each with its steps and the playhead: the selected track's lane large, its sound's name over its engine, the other five compact. The header shows the bar, the beat and the tempo.
Here the beat you make in chapter 3 is already in, so there's something to hear: tap PLAY to start it, and again to stop it.
-
Pick a track
Turn ALGORITHM: it picks the track, T1–T6, on every page. On HOME the selected track's lane grows and takes its colour. The keys always play the selected track: here track 2, PAD, then back to track 1, ACID.
-
Four knobs, four cards
KNOB 1–KNOB 4, top right, turn the four cards across the top of the screen, in the same order. Every page has its own four. On HOME they're the selected track's main sound controls, for ACID CUTOFF, RES, ATTACK and RELEASE: here KNOB 1 opens the filter and closes it again.
-
Change the sound
PRESETS changes the selected track's sound, a detent a sound, through every engine's: ACID, SINE KEY, RAVE. Two detents back and it's ACID again. On the step pages PRESETS moves the cursor instead; chapter 4 finds sounds by type.
-
Pages
The twelve buttons under the knobs open pages, each a family of them. Tap ENV for the envelope, again for ENV DEST (where the envelope goes), again for ENV 2. The footer counts them, 1/3 to 3/3, and the lit button is the family you're in.
-
Turn the pages
SELECT turns the family's pages too, one a detent, either way, stopping at the first and the last. On every page the four knobs edit its cards: here ENV DEST's KNOB 1, CUTOFF, lets the envelope open ACID's filter all the way.
-
Where you left it
SEQ opens its family on the first page, STEP: the bass line's 16 steps. Tap ENV and it opens on ENV DEST, the page you left; every family does that. HOME goes back to HOME from anywhere.
The first time you tap a button, the screen says HOLD and its name: SHORTCUTS. That's the next step.
-
Hold for a layer
Hold FX, GLO, SEL, EDIT, SEQ or ARP and its layer covers the page: a map of what the keys and the four knobs do while you hold it. The keys you press then are the layer's, not notes. A quick tap still opens the pages.
GLO's layer is the mix: the white keys from F3 solo tracks 1–6 while held, the black keys mute them (F♯3 track 1 to F♯4 track 6), and the knobs are four tracks' levels. Here C♯4 mutes the drums and brings them back. Let go and the page is back.
-
Keep it open
Hold HOME (that's SHIFT) and tap the layer's button: the layer stays open with nothing held, and the header says GLO LOCKED. Here F♯3 mutes the bass and brings it back. Tap GLO again to close it (HOME closes it too). Holding the button and then pressing HOME does the same.
-
SHIFT
Hold HOME on its own. After a moment a map covers the page, with what every control does on it. On HOME: PRESETS the sound, GLO + SELECT the tempo, ALGORITHM the track, a held button its layer, SAVE held undo, and the SHIFT combos, such as SHIFT + SAVE for TAKE. Every page has its own map, and its footer says LET GO: MENU.
-
Yes or back
Wherever the unit asks or acts, OCT+ does it and OCT− goes back; the footer says what each one does there. Tap SAVE, turn SELECT to PROJECT, and KNOB 3 picks NEW. OCT+ would start a new project, so a dialog asks first: NEW PROJECT? The music now goes, and it can't be undone.
-
Cancel
CANCEL is the dialog's default: OCT−, and nothing has changed. HOME goes back to HOME, from any page.
START HERE
Your first beat
-
A new unit
Start on HOME, the page with all six tracks. Fresh from the installer, each track has a sound and no notes: 1 ACID, 2 PAD, 3 PULSE LD, 4 DRUM KIT, 5 PIANO and 6 DRUM KIT. Play a few white keys: the keys play the selected track, here 1, ACID.
Made music already? Start a new project instead: tap SAVE and turn SELECT to PROJECT, pick an empty slot with KNOB 1, turn KNOB 3 to NEW and press OCT+. Your other projects stay saved.
-
Pick the drums
Turn ALGORITHM: it picks the track, on every page. Turn it three detents to track 4, DRUM KIT. Now the keys play the drums: C4 is the kick, D4 the snare, F♯4 the closed hat.
-
Open the grid
Tap SEQ. On a drum track its STEP page is a grid: a row for each drum (BD bass drum, SD snare, CP clap, CH closed hat, OH open hat, TM tom, RS rim, CB bell) and a column for each step. The 16 white keys are the 16 steps, left to right. You don't need REC for this.
A black key picks a row, and plays its drum: F♯3 the kick, G♯3 the snare, C♯4 the closed hat.
-
Play
Tap PLAY. It lights green, and a light runs along the white keys: the playhead. The keys on the beats (1, 5, 9, 13) glow a little brighter, to count by.
-
Kick
F♯3 picks the kick row again. Now tap the white keys for steps 1, 5, 9 and 13: F3 C4 G4 D5. A kick on every beat.
-
Snare
G♯3 picks the snare row. Steps 5 and 13, C4 and D5: the backbeat.
-
Hats
C♯4 picks the closed hat. Steps 3, 7, 11 and 15, between the beats: A3 E4 B4 F5.
A key on a step that already has a hit takes it away: tap F5 again and the last hat goes, once more and it's back.
-
Tempo
Hold GLO and turn SELECT: a detent is one BPM, and the header shows the tempo. Here it goes from 120 to 110. (SELECT alone turns pages; MENU › CONTROL › BPM LOCK OFF makes it the tempo knob, as on Felucca.)
-
A bass line
Tap PLAY to stop, then turn ALGORITHM back to track 1. You stay on SEQ › STEP, which now shows track 1's 16 steps as tiles, the cursor on step 1.
-
Write steps
Tap OCT− once, so the keys play an octave lower. Then tap REC: stopped, on the STEP page, the screen says KEYS WRITE STEPS. Each key you play is written to the step under the cursor, the white tile, and the cursor moves on. PRESETS moves the cursor too, so one detent leaves a step empty.
The line here: A, rest, A, rest, A an octave up, rest, A, rest, G, rest, A, rest, C, rest, E.
-
Listen
Tap REC again to stop writing, then PLAY: drums and bass together. (Armed while playing, the keys would record live instead, at the playhead: that's chapter 7.)
-
Change the sound
Tap HOME and turn PRESETS: track 1 plays the same notes with each sound you reach, ACID, SINE KEY, RAVE, SUB BASS. On the step pages PRESETS moves the cursor instead; the sound changes on HOME and the sound pages. Chapter 4 finds sounds by type.
-
Undo
Hold SAVE: the last change is undone. A run of PRESETS turns counts as one change, so it's back to ACID. While the UNDO box shows, OCT− goes further back and OCT+ redoes. Eight changes are kept.
-
Nothing to save
Patterns have no save step: what a track plays is kept as its pattern, written to flash at the quiet autosave. Switch off and on, and with MENU › SYSTEM › RESTORE LAST on (it is, out of the box) the beat is still there.
MAKE MUSIC
Sounds and engines
-
A sound on every track
Every track has a sound, its name on HOME over its engine's. PRESETS changes the selected track's, a sound a detent, through every engine's. Here the beat from chapter 3 plays with two chords on track 2: ALGORITHM to track 2, and PRESETS takes them from PAD to FM MARIMBA and FM ORGAN, then back.
-
The list
Back on track 1, tap SAVE and turn SELECT back to PRESETS. (The first time, SAVE opens USER; after that, the page you left.) Every sound is in the list, the selected track's marked, with its place (No. 5 of 148). KNOB 1 or PRESETS steps through it, and each sound plays as you reach it. The footer names the track's engine and sound.
-
By type
KNOB 4 is LIST: ALL, FAV, then the types, BASS, LEAD, PAD, KEYS, PLUCK, DRUM and FX. On BASS the list holds the basses of every engine, 19 of them, and PRESETS steps through those only: SUB BASS, NIGHT BASS, REESE.
-
Any engine
The list mixes the engines, and its left column says whose each sound is. FM BASS is FM6's: reach it and the track switches engine. Its notes, its mix and its effects stay as they were.
-
Favourites
KNOB 3, FAV: right marks the sound playing as a favourite, a star in the list; left unmarks it. LIST on FAV (KNOB 4 back one) shows your favourites only. Your own sounds, from SAVE › USER, are on ALL and FAV too.
-
Engine to engine
KNOB 2, ENG, jumps to the next engine's first sound, whatever the LIST: PHASE's PD BRASS, then LOFI's PULSE LD. With LIST still on FAV, PRESETS goes straight back to the favourite, FM BASS.
The LIST stays where you leave it, through a power-off too, and it's the unit's, not the track's: on HOME and the sound pages PRESETS steps through it as well.
-
Pick an engine
Hold EDIT for its layer: the 14 engines on the white keys, F3 ANALOG to E5 DRUM-X, and on the knobs ENG, No. (the engine's sounds) and FAV. A key loads that engine's first sound on the selected track: here track 2, G4 GRAIN (CLOUD PAD), D4 VOICE (CHOIR AAH), F3 ANALOG (SAW LEAD). OCT−, with EDIT held, puts back the sound the track had. On tracks 5 and 6 PHYS and GRAIN are dark: they're for tracks 1–4.
-
Make it yours
On HOME the four knobs are the sound's main controls, on ANALOG CUTOFF, RES, ATTACK and RELEASE. Here KNOB 1 darkens SAW LEAD, KNOB 2 adds resonance and KNOB 4 lengthens the release, so the chords ring into each other. Every engine has more on its own pages: chapter 10.
-
Start over
In the EDIT layer the key after the engines, F5, is INIT: the sound starts over from its engine's first one, with everything else back to the engine's defaults (on FM6, a bare sine: chapter 11). It asks first, INITIALIZE SOUND?, and SAVE held would undo it. Here OCT− cancels: the sound stays as you made it.
-
Save it
Sounds of your own live in SAVE › USER, 32 slots. Saving writes to flash, so stop first: PLAY. Stopped, the keys still play the sound. Tap SAVE and turn SELECT to USER; KNOB 1 picks the slot, and SAVE is already picked: the footer says OCT+: SAVE.
-
Name it
OCT+ opens NAME with the slot's automatic name. The white keys type, phone style: AB on F3, CD on G3 and so on, the same key again within a moment for the next letter; another key moves on. C♯4 deletes (held, it repeats), G♯3 is a space, F♯3 and A♯3 move the cursor, D♯4 switches to digits; the black keys do the same in the upper octave.
Here C♯4 held clears ANALOG 01, then WARM: B4 twice, F3, G4, D4 twice.
-
Yours
OCT+ writes it: SAVED U01, and U01 is WARM. PLAY, and track 2 plays on with it. Your sound is on the PRESETS lists ALL and FAV, and on SAVE › USER KNOB 2, LOAD, and OCT+ put it on whichever track is selected; KNOB 3 erases it, and one detent further renames it.
MAKE MUSIC
Keys, scales and the arp
-
The keys
The keys play the selected track: 27 of them, F3 to G5. Here the beat from chapter 3 plays, and ALGORITHM picks track 5, PIANO, for this chapter.
-
Octaves
OCT+ moves the keys an octave up and OCT− an octave down, up to three each way; the header says OCT +1. Both together: back to the middle. Here one OCT− for the rest of the chapter.
-
A scale
Tap SEL for SCALE: ROOT, SCALE, QUANTIZE and TRANSP. KNOB 2 picks one of 16 scales, from CHR (all twelve notes) and MAJ to the modes, the pentatonics, BLUES and the diminished ones; MIN is the natural minor. The keyboard on the screen marks the scale's notes. On its own a scale changes nothing yet: QUANTIZE and the chord keys use it.
-
The root
Hold SEL for its layer and tap a key: its note name becomes the ROOT, whatever the octave. A3 makes it A minor, the bass line's key. The layer's knobs are ROOT, SCALE, CHORD and VOICING, its map shows the 16 scales, and OCT− puts back what you changed.
-
In key
KNOB 3, QUANTIZE. WHITE puts the scale on the white keys only: C4 plays the root, each white key the next note of the scale, up and down, and the black keys are silent, so every note is in key. SNAP keeps every key and rounds it down to the scale; SEQ also bends the sequencer's notes to the scale as they play, and SEQ+T transposes them by TRANSP first. KNOB 4, TRANSP, moves the keys by semitones.
-
Chords
Tap SEL again for CHORD. KNOB 1 picks the chord keys: DIA3, the scale's own triads, so each key plays the scale's chord on its note (here C4 A minor, A4 F, B4 G); DIA7 its sevenths; or one fixed shape on every key, MAJ, MIN, DOM7, MAJ7, MIN7, SUS4 or POW. The screen names the chord played last. MONO tracks play its root only.
-
Voicing
KNOB 2, VOICING, stacks the same notes another way: CLOSE, OPEN (the middle note an octave up), the inversions INV1 and INV2, and +OCT, the root added an octave down.
-
The arp
Tap ARP for the arpeggiator: MODE, RATE, OCTAVE and GATE. Turn KNOB 1, MODE, from OFF to UP (there are 14 modes) and hold a key: its notes play one after another at the RATE, in time with the beat. With chords on, one key is a whole arpeggio.
-
Hold
Tap ARP again for ARP 2: SWING, CHANCE, HOLD and ORDER. KNOB 3, HOLD ON, latches: let go and the arp plays on, and the next key or chord you play takes over (here F, then A minor again). ORDER plays the notes by pitch (NOTE) or as you played them (PLAYED).
-
Range and length
Turn SELECT back to ARP. KNOB 3, OCTAVE 2, runs the pattern over two octaves (up to four); KNOB 4, GATE, shortens each note. KNOB 2, RATE, sets the speed, 4 bars to 1/32 with the triplets. The latched arp plays on while you turn.
-
Swing and chance
SELECT to ARP 2 once more: KNOB 1, SWING, delays every other note, here by 30 %, and KNOB 2, CHANCE, lets each note play or rest by chance. REC records the arp as it does the keys: chapter 7.
MAKE MUSIC
Steps
-
The step page
Tap SEQ for its first page, STEP: the selected track's bar as 16 tiles, two rows of eight like the halves of the keyboard, each note on its tile, the playing step's number lit. The white tile is the cursor: KNOB 1 moves it, and so does PRESETS on the step pages (the footer says PRESETS: STEP). Here the bass line from chapter 3 plays on track 1.
-
Note
KNOB 2, NOTE, moves the cursor step's note a semitone a detent: step 5's A3 down to G3. On an empty step the first detent puts in the last note used and the next ones move it: step 6 gets G3, then A3. No REC needed: the knobs edit the steps as they play.
-
Velocity
KNOB 3, VELOCITY: how hard the cursor step plays, 1 to 127. Step 7 goes down to 50, a little softer. A note put in with KNOB 2 shows 0: it plays at the default, 96, until you turn it.
-
Chance
KNOB 4, CHANCE: the chance the step plays each time round, 0 to 100 %. At 50 % the new note on step 6 comes and goes, and its tile gets a block in the corner. SEQ › CHANCE adds ratchets, flams and conditions: chapter 8.
-
The piano roll
Tap SEQ again for ROLL: the same steps on a piano roll, higher notes higher, the cursor's step framed. Its knobs are STEP, NOTE, TIME and FLAG.
-
Tie
KNOB 3, TIME: NOTE, TIE or REST. An empty step is a REST; one detent back makes it a TIE, so the note before it, step 13's C3, lasts through it.
-
Slide
KNOB 4, FLAG: ACC accents the step (it plays at full velocity), SLD slides it into the next note, A+S does both. Step 5's G3 now glides up into step 6's A3, the acid way.
-
Length
Turn SELECT to PATTERN, the pattern's own settings: LENGTH, DIV, SWING and GATE. KNOB 1, LENGTH, runs from 1 to 64 steps: at 8 the first half bar plays twice, back at 16 the whole line again. Past 16, the step pages turn with the playhead. DIV is a step's length, from 4 bars to 1/32 with the triplets; SWING delays every other step.
-
Gate
KNOB 4, GATE: how long every note of the pattern lasts, as a share of its step. Down to 27 % the line is short and tight. SEQ › PLAY gives a single step a GATE of its own.
-
Clear a step
Turn SELECT back to STEP. With REC armed, EDIT clears the cursor step and moves on: STEP CLEARED. Tap REC again to disarm it. (Armed while playing, the keys would record live; armed while stopped on STEP, they write steps: chapter 3.) SAVE held puts a cleared step back.
-
Step preview
STEP PREVIEW is a setting: hold HOME and let go for the MENU, ALGORITHM to CONTROL, PRESETS down to STEP PREVIEW, KNOB 1 to ON. It works when the music is stopped, so PLAY stops it, and HOME closes the MENU.
-
Hear each step
Stopped, with STEP PREVIEW on, every move of the cursor by KNOB 1 or PRESETS plays the step it lands on, once, on STEP, ROLL and the grid: here steps 8 to 15, the empty ones silent.
-
Drum steps
PLAY, and ALGORITHM to track 4: on a drum track STEP is the grid (chapter 3), and its knobs are STEP, LANE, HIT and ACC. KNOB 1 to step 13, KNOB 2 to the SNARE lane, KNOB 4 accents its hit (it brightens); KNOB 1 on to step 16 and KNOB 3 adds a snare there.
MAKE MUSIC
Recording and takes
-
Pick a track
The beat from chapter 3 plays: tap PLAY, and turn ALGORITHM to track 5, PIANO. The keys play the selected track as always, and nothing is kept: track 5 has no notes, so its lane on HOME stays empty.
-
REC
Tap REC: the selected track is armed the moment it's pressed, and the header's play mark becomes a red dot. Armed and playing, the keys record at the playhead: a note goes into the step playing, or into the next one when it's played past the step's middle. Here a riff of eighths, E5 D5 C5 A4 and back up, which plays back on the next pass. A key held on ties into the steps after it. Stopped, REC starts the transport too; on a melodic STEP or ROLL page it writes steps instead (chapter 3).
-
Overdub
Still armed, every pass records on top of the last: what's there stays. Here a third under four of the notes. On a POLY sound like PIANO they join the step's notes as a chord, up to four; a MONO track's step takes the new note instead.
-
Done
Tap REC again to disarm. The riff plays on as it was recorded, kept as the track's pattern: no save needed.
-
One pass, one undo
Everything recorded between arming and disarming is one undo. Hold SAVE: UNDO RECORDING, the riff and its overdub gone together. While the box shows, OCT+ redoes it, and OCT− would go further back.
-
The REC layer
Hold HOME (SHIFT) and tap REC: the REC layer opens locked, REC LOCKED in the header. Its white keys are CLEAR, CLICK, COUNT-IN and CLICK LVL, each press the next value; its knobs are CLICK, COUNT-IN, CLICK LVL and FEEL. While it's open the keys are the layer's, so nothing plays or records, and OCT− puts back everything changed since it opened.
-
Click
KNOB 1, CLICK: OFF, REC (a click on every beat while a track is armed) or ON (on every beat while playing). The bar's first beat is higher. CLICK LVL sets how loud. The click goes to the headphones and the speaker only, never into USB audio; these are the MENU's AUDIO settings too.
-
Count-in
KNOB 2, COUNT-IN: OFF, 1 BAR or 2 BARS. With a track armed, starting from stop counts that many bars of clicks in first, whatever CLICK says. A note played in the last half beat of the count-in lands on step 1.
-
Feel
KNOB 4, FEEL ON: a note recorded into an empty step keeps where you played it, as the step's NUDGE, instead of landing square on the step (NUDGE: chapter 8). A take keeps it too. A step that already has notes keeps its own timing.
-
Clear
Hold F3, CLEAR: the header says HOLD: CLEAR, and after the hold time track 5's steps, all 64 of them, and its automation are gone: SEQUENCE CLEARED, T5 EMPTY. It's one undo, so SAVE held brings them back. The SEQ TOOLS clear too (chapter 8).
-
Count in
Tap REC to close the layer; that tap doesn't arm. PLAY stops, and REC arms the track: instead of starting at once, the screen counts the bar in, 4 3 2 1, a click on each beat, and then the music and the recording start together on step 1. PLAY during the count-in cancels it.
-
As played
The riff again, a little behind the beat: with FEEL on, each note keeps its lateness. REC disarms, and SEQ twice opens ROLL, the piano roll: every note sits a third of a step after its line, where it was played. With FEEL OFF they would sit on the lines.
-
Take
A TAKE keeps what you just played, without REC. Tap HOME, turn ALGORITHM to track 2, PAD, and play: here two chords, A minor and G, held through a bar. In the next bar hold HOME and tap SAVE: TAKE KEPT, 6 notes. The last whole pass of the track's loop goes into its steps, held notes as ties and knob moves as automation. It needs one whole pass played since PLAY, and REC off on that track.
-
Undo
Hold SAVE: UNDO TAKE, 1 of 4 undone, and the chords are gone. While the box shows, OCT− goes further back (UNDO RECORDING: track 5's riff goes too), and OCT+ forward again, twice, to where you were. Eight undos are kept, across all six tracks.
MAKE MUSIC
Variation
-
The CHANCE page
The beat from chapter 3: tap PLAY, turn ALGORITHM to track 4, tap SEQ for the grid and turn SELECT to CHANCE. Its knobs are STEP, CHANCE (0 to 100 %, the chance the step plays each time round), RATCHET and COND, for the step under the cursor; on a drum track they're the whole step's, every lane on it. KNOB 1 moves the cursor to step 15.
-
Ratchet
KNOB 3, RATCHET: X1 to X4 plays the step that many times inside its length. Step 15's hat at X3 is a quick roll into the next bar. The grid draws the hits split.
-
Flam
Past X4, RATCHET is FLAM: a softer grace hit, then the full one 15 ms later. KNOB 1 back to step 13 and KNOB 3 to FLAM: the kick and the snare there flam.
-
Conditions
KNOB 4, COND: when the step plays at all. FILL plays it only during a fill, !FILL only when there's none; A:B plays it in pass A of every B, counted from PLAY (1:2, 2:2, 1:3 … 4:4). Step 9's kick at 1:2 plays in the first bar of every two.
-
A fill
SELECT back to the grid, G♯3 picks the SNARE lane and G5 puts a snare on step 16 (chapter 3). SELECT on to CHANCE, where the cursor is now on 16: RATCHET X4 and COND FILL. The roll waits for a fill.
-
Play the fill
Hold GLO for its layer and hold F4, FILL: while it's held, every FILL step plays (and every !FILL step rests). Here the snare roll ends each bar for two bars, then the beat goes back to normal.
-
A lock
A lock is a step's own value for a knob. SELECT back to the grid, hold D5 (step 13) and turn KNOB 1: the cards show the sound's knobs, here DRUM's PITCH, TONE, DECAY and SNAP, and PITCH goes up on step 13 only. A mark over the step shows the lock. The knobs lock what they last edited: HOME's four after HOME, an EDIT, ENV, LFO or FX page's after that page. On a melodic track, hold the step's key while REC writes steps, stopped (chapter 3); EDIT tapped with the step held clears its locks.
-
Direction
ALGORITHM back to track 1 and SELECT to PLAY: STEP, NUDGE, DIR and GATE, with the piano roll. KNOB 3, DIR, is the track's: FWD, RVRS (backwards), PING (up and down) and RAND (any step each time). The bass line plays each in turn, then FWD again.
-
Nudge
KNOB 1 to step 7 and KNOB 2, NUDGE: the step plays early or late, −32 to +31 sixty-fourths of a step. At +16 it's a quarter of a step late, and the roll draws it where it plays. FEEL sets nudges as you record (chapter 7).
-
A step's gate
KNOB 1 to step 13 and KNOB 4, GATE: the step's own note length, a lock. It starts from the track's GATE, dimmed; turned, it's the step's (here 82 %), and turned back to the track's value it follows the track again.
-
Automation
Tap HOME, REC to arm track 1 while it plays, and turn KNOB 1, CUTOFF, up and down: each move is recorded on the step it's made in. REC again, and the bar plays the moves back: the card's value follows, a MOTION mark beside its label. HOME's knobs, the sound pages, the MIXER's LEVEL, PAN and REV record this way; at each loop's start the sound goes back to its own value.
-
The list
Tap SEQ (it reopens PLAY) and turn SELECT to AUTOMATION: every move and lock of the track, by step, AUTO or LOCK, the parameter and its value. KNOB 1 picks a row, KNOB 2 moves it to another step, KNOB 3 changes the parameter and KNOB 4 the value; past its lowest it's DELETE, and OCT+ does it. The top row turns them all on or off (PLAY ON) and clears them. All six tracks share 64 records.
-
SEQ tools
Tap HOME and hold SEQ: the SEQ TOOLS on the white keys, on any page. F3 CLEAR, G3 REVERSE, A3 and B3 SHIFT the steps left or right, C4 RANDOM, D4 COOK (a few notes changed), F4 EUCLID, D5 DOUBLE and E5 HALF the length with its steps; on a drum track E4 BEAT (a basic beat) and the lane tools on G4 to C5. The knobs are the PATTERN page's. Here REVERSE, then SHIFT >. Each tool is one undo (SAVE held, once SEQ is let go); OCT− puts back the track as it was when the layer opened.
-
Euclid
Hold SEQ and tap F4: EUCLID spreads HITS as evenly as they go over STEPS, turned by ROTATE, and plays it at once. A hit on a note keeps it, one on an empty step plays the scale's root. KNOB 1 HITS 5, KNOB 3 ROTATE 2, and OCT+ applies it (OCT− cancels). On a drum track it fills the selected lane.
SHAPE SOUND
Envelopes, LFOs, MOD
-
The envelope
The beat from chapter 3 plays, and track 1 is selected: ACID, on ANALOG. Tap ENV for its envelope: ATTACK, DECAY, SUSTAIN and RELEASE, each time from 1 ms to 10 s, SUSTAIN a level. The graph draws its shape. KNOB 2 stretches ACID's DECAY from 54 to 160 ms. FM6 and the drum engines have no ENV pages (NO ENV ON FM6): they shape their notes on their own pages.
-
Where it goes
Tap ENV again for ENV DEST: how much of the envelope goes to the filter's CUTOFF, to the PITCH and to the SHAPE, each −100 to +100 %. ACID's squelch is CUTOFF +76 %: KNOB 1 down to +13 % dulls the bass, all the way up to +100 % makes every note bite. SHAPE moves the engine's shape: on ANALOG the pulse width of PWM, the second oscillator of SYNC.
-
In time
KNOB 4, SYNC ON: ATTACK, DECAY and RELEASE become note values, from 1/64T to 4BAR, and follow the tempo. Turn SELECT back to ENV to see them: DECAY reads 1/8D, and KNOB 2 takes it to 1/16, a note value a detent. SUSTAIN stays a level.
-
ENV 2
SELECT on to ENV 2: a second envelope with the same four knobs, always in milliseconds. On its own it changes nothing you hear: it's a source for the MOD slots, ENV2 (below). Here its DECAY goes up to 112 ms.
-
The LFO
Tap LFO: RATE (0.05 to 40 Hz), WAVE (SIN, TRI, SAW, SQR or S&H, a new random value each cycle), PHASE (where a note starts it) and FADE (how long it takes to come in). The graph draws two seconds of it. Here RATE 2.21 Hz and WAVE TRI; nothing moves yet, as every depth is still 0.
-
LFO dest
SELECT on to LFO DEST, the depths: PITCH, CUTOFF, SHAPE and AMP (a tremolo), each drawn as the wave it makes. KNOB 2, CUTOFF +50 %: the filter wobbles with the triangle. A little PITCH is a vibrato.
-
LFO 2
SELECT back to LFO 2. KNOB 1, SYNC, makes the LFO's cycle a note value of the tempo, 4BAR to 1/32; at 1/8 the wobble locks to the beat, and RATE dims. TRIG NOTE starts the LFO again at each new phrase, FREE lets it run. KNOB 3, POLARITY UNI, makes it one-sided: the filter only opens.
-
MOD
SELECT on to MOD: four slots, each a SOURCE sent to a DEST by an AMOUNT. The sources are the LFO, ENV, VEL, KEY, RAND (a new value each note), MODW and AT (the mod wheel and aftertouch over MIDI), EXPR, ENV2, S&H and SLEW; the destinations the pitch, the cutoff, the shape, the level, the pan, DIST and the sends, the LFO's RATE and DEPTH, the vibrato, the engine's own eight controls, and VEL and TIME. Slot 1 here: RAND to CUT, +63 %, so every note has its own brightness.
-
Slot 2
KNOB 1 picks the slot: 2. SOURCE ENV2, DEST PITCH, AMOUNT +25 %: each note starts three semitones sharp and drops into place as ENV 2 decays. The graph lists the four slots, the one being edited lit.
-
Momentary
Tap HOME. Hold LFO and turn knobs: the header says MOMENTARY, then OCT+: KEEP. Here KNOB 1 opens the CUTOFF and KNOB 2 adds RES; let go of LFO and they spring back at once: BACK. It works on HOME, the sound and FX pages and the MIXER, up to eight values at a time, and it's never recorded.
-
Keep it
Hold LFO again and turn KNOB 1, then tap OCT+ before you let go: KEPT, and the new values stay. A tap of LFO on its own still opens its pages.
SHAPE SOUND
Inside the engines
-
EDIT 1
The beat from chapter 3 plays, with two chords on track 2. Tap EDIT on track 1: the engine's first page, named by the engine (ANALOG's is OSC). Every engine has up to eight controls of its own on EDIT 1 and EDIT 2. OSC is WAVE, DETUNE, MIX and NOISE, and the graph draws the wave: KNOB 3, MIX, brings in the second oscillator and KNOB 2 detunes it, SAW, A SECOND ONE 16 CT UP.
-
EDIT 2
Tap EDIT again for EDIT 2, FLT: CUTOFF, RES, DRIVE and KEYTRK, the low-pass drawn with its peak. KNOB 3, DRIVE, roughens the bass. Other engines fill these pages their own way: FM6 its algorithm, WHEEL its drawbars, SAMPLE the wave of the note played last; most draw the sound as it plays.
-
Voice
EDIT again: VOICE, how the track plays its notes. VOICE is POLY (a voice a note), MONO (one voice, a new attack each note), LEG (one voice, no new attack) or UNI (every voice on one note). ACID is LEG; KNOB 2, GLIDE, slides each note into the next, here 90 ms. GL MODE RATE keeps the speed the same, TIME the time; PRIORITY picks the note a MONO track plays when several are held.
-
Voice 2
ALGORITHM to track 2, the PAD, on its own VOICE page, POLY; SELECT on to VOICE 2: ALLOC (ROT takes the next voice in turn, so release tails ring out; REUSE the free voice nearest in pitch), DETUNE (UNI only) and SPREAD. KNOB 3, SPREAD, sends the chord's voices left and right of the track's PAN in turn. The boxes are the voices, lit as they sound.
-
Another engine
Tap EDIT: past the last page it goes round to EDIT 1, here FM6's, OPS: ALGO, FEEDBACK, MOD LVL and RATIO, the algorithm drawn as its operators. KNOB 3, MOD LVL, brightens the pad. FM6's own OPERATOR and ALL OPS pages come before VOICE: chapter 11.
-
DRUM's kits
ALGORITHM to track 4: DRUM's EDIT 1 is KIT, PITCH, TONE and DECAY. KNOB 1, KIT, swaps the whole kit: STD, the five virtual-analog kits 80, 10, 66, 55 and 77, and DEEP, TIGHT and PERC. KIT 80: a deep sine kick, a noisy snare.
-
Lanes
EDIT twice, past EDIT 2 (HIT), for LANES: each drum of the kit on its own. KNOB 1 picks the lane, KICK here; KNOB 2 is its LEVEL, KNOB 3 its TUNE (−6 semitones) and KNOB 4 its DECAY, longer (0 % is as the kit has it).
-
DRUM-X
Hold EDIT and tap E5: track 4 on DRUM-X (chapter 4), the same notes on its kit. DRUM-X synthesizes each of its eight sounds from an oscillator, a pitch envelope and noise, in two patches, A and B, with MORPH between them. One kit is the project's; LANES is DRUM's, so EDIT 1 opens instead (NO LANES ON DRUM-X).
-
The SOUND sheet
EDIT twice for SOUND: one sound of the kit on one sheet, BD first. PRESETS (or a key struck) picks the sound, SELECT moves the knobs down the sheet: PITCH, P MOD, DECAY, NOISE and COLOR, each A beside B, then LEVEL, DRIVE and the switches WAVE, FILTER, SNAP and P SHAPE. KNOB 1, PITCH A, takes the kick down.
-
Slice
ALGORITHM to track 6, hold EDIT and tap C5: SLICE, a drum break cut into slices (CHOP: BREAK in 16). Every key plays one, from F3, black keys too: F3 to C4 in order are its first half bar, and any order chops it up. Sequenced, the steps' notes pick the slices.
-
The slices
EDIT twice, past PLAYBACK (MODE, RVRS, DECAY, CUTOFF), for SLICES: the wave around a slice, its markers, and the whole sample under it. KNOB 1 steps through the slices, and a key shows the slice it plays. On your own samples KNOB 2 moves a marker and KNOB 3 and 4 split and join slices (OCT+ does it); the built-in loops are view only.
-
Sources
SELECT back to EDIT 1, SLICE: KNOB 1, SOURCE, runs BREAK, USR1, USR2, USR3, PIANO and FUNK; DIV cuts it in 4 to 32 or where the hits are (AUTO). FUNK is the second loop, two beats of funk. USR1–3 are your own samples, put on the unit with the web editor's Samples tab (chapter 19); SAMPLE and GRAIN play them too. An empty one plays a sine and says NO SAMPLE.
SHAPE SOUND
FM6 LAB
-
Track 2: FM6
The drums from chapter 3 play, a little quieter, and track 2 has a riff of long notes, so you can hear how each note starts and fades. Tap PLAY and turn ALGORITHM to track 2: FM6, with its power-on sound, PAD. FM6 is classic six-operator FM. Each operator is a sine wave with an envelope of its own, and an operator that modulates another bends that one's sine into a brighter, richer wave.
-
Start from a sine
Hold EDIT and tap F5, INIT (chapter 4): INITIALIZE SOUND? asks first, and OCT+ does it. On FM6, INIT is the bare sine to build from: OP1 alone, playing as an organ does (full level while the key is down, gone the moment it's let go), algorithm 1, every macro at 0. HOME names it INIT VOICE, the patch's own name. SAVE held would undo the INIT; the knob turns that follow aren't undone, as no knob turn is.
-
Operator
Tap EDIT three times: EDIT 1 (OPS: the algorithm and the macros), EDIT 2 (PATCH: OWN, the track's own patch, which every edit here goes into), then OPERATOR. On OPERATOR, PRESETS picks one of the six operators (OPERATOR 1 in the header) and SELECT moves the knobs through its five windows: TONE, ENV 1, ENV 2, KEYS and MORE. TONE is OUTPUT, RATIO, FINE and DETUNE.
The graph is a note of C4 as the engine plays it: each operator's level, from the key going down at the left, to the dotted line where it's let go, then the release. Time runs on a log scale, so a 1 ms attack and a 4 s decay both show; the note's length is at the right, 0.35 S. OP1 is a thick blue line: PURE SINE.
-
The bite
Turn PRESETS: OPERATOR 2, at OUTPUT 0, silent. In algorithm 1 OP2 modulates OP1, so it's drawn as a thin line in its own colour; the thick lines are the carriers, the operators you hear. Turn KNOB 1, OUTPUT: at 40 OP1's line turns purple, at 70 red, and the sine has an edge.
That colour is the point of the graph. Each carrier is shaded along its length by its bite: how hard its modulators bend it at that moment, from cool blue (a pure sine) to red (FM at its brightest). The key under the graph runs SINE to FM, and BRIGHTEST 1 MS says where it bites most, with a mark under the graph.
-
The bite fades
SELECT to ENV 1 and on to ENV 2. An operator's envelope is four rates and four levels: at RATE 1 to LEVEL 1 when the key goes down, on to LEVEL 2 and LEVEL 3, held there until the key is let go, then at RATE 4 to LEVEL 4. Rates run from 0, the slowest, to 99, at once.
KNOB 2, OP2's LEVEL 3, to 0: OP2 drops away straight after the attack, and OP1 is red for an instant only, a click of bite. KNOB 1, RATE 3, to 59: OP2 falls slowly, and OP1 fades from red to blue along the note. Each note starts bright and mellows into a sine, the move behind FM's plucks, basses and pianos. OP1's line keeps its shape: its level hasn't changed, only its colour.
-
The bite comes late
SELECT back to ENV 1 and turn KNOB 1, OP2's RATE 1, down to 35: OP2 now takes its time to rise, so the bite comes in late and fades again, blue, then red, then blue. BRIGHTEST 0.28 S, and the mark moves under the peak: a swell, the way brass gets brighter as it's blown.
-
Shape is level
Turn PRESETS back to OP1, the carrier, and SELECT to ENV 2. KNOB 2, LEVEL 3, to 0: the line drops straight after the attack, and every note is a blip. KNOB 1, RATE 3, to 49: it falls slowly, and each note dies away, like a struck key; the graph stretches to the note's new length, 1.9 S. This time the shape changes and the colour stays where OP2 puts it: blue, red at the late bite, blue again. A carrier's shape is how loud you hear it, its colour how bright.
-
Ratio
PRESETS to OP2, SELECT back to ENV 1, and KNOB 1, RATE 1, back to 99: the bite is at the attack again. SELECT back to TONE and turn KNOB 2, RATIO, from 1 to 14, a detent at a time: each ratio puts the bite on another set of overtones, and at 14 it rings like a bell, the tine of a classic FM electric piano. The colour doesn't change: it shows how much a carrier bites, not which overtones. The tabs over the graph show every operator's ratio (14x). RATIO runs from x0.5 to x31, then to fixed frequencies (1, 10, 100 and 1K HZ) that don't follow the keys; FINE shows the ratio it makes, 14.00.
-
Two carriers
PRESETS to OP3. In algorithm 1 OP3 is a carrier too, and with OP4 silent nothing modulates it. KNOB 1, OUTPUT 80: a second thick line, blue and level all along, a plain sine under the bell, the body of the sound. Two carriers, two colours: each is shaded by its own modulators only.
-
Across the keys
PRESETS back to OP2 and SELECT on to KEYS, past ENV 1 and ENV 2: the operator's level across the keyboard, 0 dB at the top and −48 dB at the bottom, BREAK a dotted line (C4 here) and C4 a dot. L DEPTH and R DEPTH turn it down below and above BREAK, along L CURVE and R CURVE (−LIN, −EXP, +EXP and +LIN; the + ones turn it up). KNOB 3, R DEPTH 60: OP2 falls away above C4, to −46 dB at C7, so the riff's high notes bite less.
-
The algorithm
SELECT on, past MORE (BREAK, KEY RATE, VELOCITY and LFO AMP), to ALL OPS, the patch's own values. Its first window, ALGO, draws the algorithm with the operator PRESETS picks lit, and says what it does: OP2 MODULATES OP1, OP3 GOES TO THE OUTPUT, OP4 IS SILENT: OUTPUT 0. KNOB 1, ALGO, picks one of the 32; KNOB 2 is FEEDBACK (one operator modulating itself, OP6 in algorithm 1) and KNOB 3 TRANSP, in semitones.
-
Vibrato
SELECT on through PITCH 1 and PITCH 2 (the pitch envelope's rates and levels, in semitones) and LFO, to DEPTH: VIBRATO, VIB SENS and TREMOLO. KNOB 1, VIBRATO 30: the graph draws two seconds of it from the key going down, ±0.50 ST, the note's outline behind it: VIBRATO 5.8 HZ.
-
Fade in
SELECT back to LFO: WAVE, RATE, FADE and KEY SYNC. KNOB 3, FADE 60: the vibrato waits and comes in gradually, IN AFTER 0.62 S. TREMOLO moves the level instead of the pitch, on the operators whose LFO AMP (MORE) is above 0.
-
Save it
Your sound is kept as a user sound, as in chapter 4, the whole patch with it. Stop first: PLAY. Tap SAVE: the first time, it opens on USER, with SLOT U01 and SAVE already picked (OCT+: SAVE). OCT+ opens NAME with the automatic name, FM6 01.
-
Name it
C♯4 held deletes it, then the white keys type, phone style: TINE is A4 (TU), C4 (IJK), E4 (NO) and A3 (EF), one tap each. OCT+ writes it: SAVED U01, and the list says U01 TINE. The name goes into the FM6 patch too, so a
.syxof it from the web editor carries it. -
Yours
PLAY, and HOME: track 2 is TINE. It's on the PRESETS lists ALL and FAV, and LOAD on SAVE › USER puts it on any track. Every value of it can be changed again here, or in the web editor.
SHAPE SOUND
Track effects
-
The FX page
The beat from chapter 3 plays, with two chords on track 2. Tap PLAY, then FX: track 1's FX page, the first of six. (The header says HOLD FX: SHORTCUTS for a moment: held, FX is the FX layer, chapter 16.) DIST is the track's own distortion, set on DRIVE, next. CHORUS, DELAY and REVERB are sends: how much of the track goes to the three effects every track shares, which GLO sets up (chapter 13). The faders draw all four. ACID sends 35 % to the delay; KNOB 3 up to 71 %, and its echoes come forward.
-
Drive
Tap FX again for DRIVE: DIST, TYPE and TONE. DIST pushes the track into the TYPE's curve, from none at 0 % (TYPE and TONE then change nothing) to about nine times; the graph draws the curve with a sine going through it. KNOB 1, DIST, from ACID's 16 % to 55 %: the bass growls.
-
Four types
KNOB 2, TYPE: SOFT rounds the peaks off, HARD clips them flat, FOLD folds them back (the sine turns to ripples) and BITS takes bits away and holds samples, a lo-fi crunch. Back to FOLD, then KNOB 3, TONE, to −62 %: darker. TONE moves the drive's own low-pass, minus darker and plus brighter.
-
Insert
FX again: INSERT, a second effect on the track, after DRIVE. KNOB 1, TYPE, runs OFF, SOFT, HARD, FOLD, FUZZ, CRUSH, PHASR, FLANG and CHOR, and the other three knobs take their names from it: DRIVE, TONE and LEVEL for the four drives, BITS, RATE and LPF for CRUSH, RATE, DEPTH and FDBK for the three sweeps. Here the bass goes through each on the way to PHASR, a phaser: RATE 1.45 Hz, DEPTH 76 %, FDBK 76 %, its sweep drawn.
-
Mix
FX again: INSERT 2, one knob, MIX: how much of the track goes through the INSERT. KNOB 1 from 100 % down to 50 %: half the bass through the phaser, half as it was. At 0 % the INSERT is out of the way, as at OFF.
-
The slicer
ALGORITHM to track 2, the pad. The FX pages follow the track: tap FX again for SLICER. KNOB 1, SLICER, from OFF to GATE: the chords are chopped in time with the beat, the pattern drawn as 16 bars, the step playing underlined. PATTERN 1 opens every other sixteenth. RATE sets the step, from 1/8 to 1/32 and their triplets; DEPTH how far a gap closes.
-
Patterns
KNOB 2, PATTERN, picks one of 16: 3, a dotted rhythm (x..x..x..x..x.x.), then 6, four steps on and four off. A tall bar plays, a short one is a gap.
-
Stutter
KNOB 1 on to STUT: a step that plays is recorded, and the steps after it that would be gaps play that recording again, a stutter instead of a silence. The graph hatches them. DEPTH is then the repeat's level.
-
Duck
KNOB 1 back to OFF, and FX again: DUCK, the last page. KNOB 1, BY, picks the track to duck under (it steps over the track itself): T4, the drums. Every kick now pushes the pad down by DEPTH, 76 %, and it comes back over RELEASE, 199 ms: the pump of side-chained dance music. A drum track counts its KICK lane only, so the hats move nothing. The graph draws the pad's level over a bar of T4's kicks.
-
Depth and release
KNOB 2, DEPTH, 100 %: silent at each kick. KNOB 3, RELEASE, 476 ms: slower to come back, a longer swell. DUCK works after the INSERT and the SLICER and before the track's LEVEL, so its sends dip with it. SLICER and DUCK belong to the track and stay when you load another sound; the sends, DRIVE and INSERT come with each sound. With REC armed, turns on these pages are recorded as automation, except the SLICER's and BY; held LFO makes them MOMENTARY (chapter 9).
ARRANGE AND PERFORM
Mixer and global FX
-
The mixer
The beat from chapter 3 plays, with two chords on track 2 and a piano line on track 5. Tap PLAY, then GLO: the MIXER, the first of GLO's five pages. A strip for each track: its number, the sound's first word, a fader with the level meter beside it, the level in dB and the pan (C in the middle, L62 to the left); a muted track's strip says M. The four knobs are the selected track's LEVEL, PAN, REVERB and MUTE, and ALGORITHM picks the track, here track 1 at first.
-
Level
ALGORITHM to track 5, the piano. KNOB 1, LEVEL, from −4 dB, where every track starts, up to 0 dB, half a dB a detent; it runs from OFF to +7.5 dB.
-
Pan
KNOB 2, PAN, −62 %: the piano moves to the left, and its strip says L62.
-
Reverb send
KNOB 3 is the track's REVERB send, the same value as on its FX page (chapter 12): how much of it goes to the reverb. From the piano's own 28 % to 60 %: it sits further back.
-
Mute
KNOB 4 to the right mutes the track: ON, and M on its strip, its meter still. To the left it plays again; here the piano stays muted for now. A mute isn't recorded.
-
Delay
Tap GLO again: DELAY, the echo every track sends to, by its DELAY send. TIME is a note value, 4BAR to 1/32 with the dotted ones (1/4D, 1/8D, 1/16D) and triplets; KNOB 1 one detent left, from 1/8 to 1/8D, the dotted eighth. KNOB 2, FEEDBACK, from 47 % to 63 %: more echoes, each a little quieter. COLOR is their brightness, MIX their level; the graph draws the dry hit and the echoes over the beats.
-
Reverb
GLO again: REVERB. KNOB 1, TYPE: ROOM, SPRING (the coil of an amp's spring), then HALL, darker and longer. KNOB 2, SIZE, from 71 % to 87 %: a longer tail. DAMP darkens it. The graph draws the first reflections, then the tail.
-
Chorus
GLO again: CHORUS, here mostly the pad's, which sends 47 % to it. RATE and DEPTH are its sweep; KNOB 3, MODE: CHORUS, FLANGER or PHASER. FLANGER, and KNOB 4, FEEDBACK, up to 31 %: the sweep rings. The graph says what each mode does, here THE DRY AND ITS COPY: A COMB, SWEPT.
-
Global
GLO again: GLOBAL, the last page: BPM, and SWING+, swing for every track on top of each pattern's own SWING (chapter 6). KNOB 2 to 50 %: every off-step comes late, SWING 60:40, drawn over the bar. The tempo can also be set from any page: hold GLO and turn SELECT (chapter 3).
-
The GLO layer
Hold GLO: the GLO layer, GLO SET in the header. The white keys F3 to D4 solo tracks 1–6, E4 is ALL, F4 FILL (chapter 8) and G4 TAP; the black keys F♯3 G♯3 A♯3 C♯4 D♯4 F♯4 mute tracks 1–6. The four knobs are the levels of the four tracks around the selected one, here 2 to 5: KNOB 1 takes the pad down to −8 dB. HOME with GLO keeps the layer open (LOCKED), and OCT− puts the levels, the mutes and the tempo back as they were when it opened.
-
Solo
Hold GLO, then hold F3 and B3: tracks 1 and 4, the bass and the drums, play alone, as long as the keys are held, and the other tracks' cards dim. Let go and they're all back.
-
Mutes
Hold GLO. A black key mutes its track, and it stays muted after you let go, until it's tapped again: G♯3, the pad, its cell lit and its card dimmed. D♯4's cell is lit already: the piano's mute from the MIXER, the same switch.
-
All
Hold GLO and tap E4, ALL: every muted track plays again at once, the pad and the piano.
-
Tap tempo
Hold GLO and tap G4, TAP, in time: the header says TAP 2 MORE, TAP 1 MORE, then the tempo follows the taps, here four taps half a second apart: 120 BPM. A pause of 2 s starts the count again; on an outside clock it says TAP: CLOCK IS EXTERNAL.
-
From the top
Hold GLO and tap PLAY (the layer's footer says PLAY: RESTART): every track starts again from its first step at once, without stopping. With SONG on it starts the song from the top (chapter 14).
ARRANGE AND PERFORM
Patterns and the song
-
The pool
This unit has patterns to arrange, made as in chapter 3: the beat and a fill on track 4, two bass lines on track 1, the chords on track 2. Tap PLAY, then SAVE (USER, the first time) and turn SELECT to PATTERNS: the pool, 64 patterns, 01 to 64, shared by every project. A pattern is a track's notes exactly as they play: its steps, LENGTH, DIV, SWING, GATE and direction, its automation and locks; the sound isn't part of it. 01 to 05 are kept here. KNOB 1 picks one: its LENGTH and USED, how many entries name it. OCT+ clears one that nothing uses, stopped, after asking.
-
Each track's list
Tap SEQ: STEP, whose header names the pattern being edited, A · 03. Turn SELECT on to SONG, the last SEQ page: a row for each track, its list of 16 entries, A to P, across. An entry names a pattern and its REPS, how many times it plays (1 to 16), the ticks under its tile. The entry a track is on is filled with its colour; a dot is an empty entry. KNOB 1 picks the entry, KNOB 2 a pattern for it, KNOB 3 its REPS, KNOB 4 SONG.
-
Play an entry
KNOB 1 to entry B, pattern 04 (the bass on F and G), and OCT+, as the footer says, PLAY: while playing it waits for the LAUNCH point, by default the end of the track's loop: T1 B AT LOOP END, the tile outlined until it comes in. Stopped, it switches at once. (PERFORM sets the LAUNCH point and launches entries from the keys: chapter 15.)
-
Song on
KNOB 4, SONG ON, and the header says SONG ON too. Each track now plays an entry its REPS times and then moves on to the next, at the end of its own loop; after the last, back to the first. The drums play 01 three times, then the fill once; the bass 04 twice, then 03. With SONG OFF each track loops the entry it's on.
-
A new entry
ALGORITHM to track 2: its list is one entry, A, 05, two times. KNOB 1 to C and KNOB 2 through the kept patterns to 05: the footer says OCT+: SET 05. OCT+: T2 C SET 05.
-
A rest
KNOB 1 back to B. Empty and between two patterns, it's a rest, a dash on the row: the pad plays A twice, rests for B's one pass (KNOB 3 sets how many), plays C, and goes round. Empty entries after the last pattern end the list.
-
From the top
Hold GLO and tap PLAY: every track goes back to its first entry and the song starts again from the top. PLAY alone goes on from the entries the tracks are on.
-
A copy of its own
SELECT on to SONG, KNOB 1 to C and KNOB 2 one detent on, past the kept patterns: COPY, and the footer says OCT+: COPY 05 TO 06. OCT+: COPIED 05 TO 06, a new pattern copied from 05, and C names it. Now C can change without touching A. KNOB 2's last choice, CLEAR, empties an entry, stopped, after asking.
-
Nothing to save
Tap SAVE: PATTERNS, as you left it, and KNOB 1 on to 06: LENGTH 16, USED 1x. Patterns keep themselves: what a track has is kept as the pattern it's on, written to flash at the quiet autosave (stopped, nothing sounding) and before a project is saved or loaded. A project (chapter 17) keeps the lists, the sounds and the mix; the patterns stay in the pool.
ARRANGE AND PERFORM
Perform
-
The PERFORM layer
This unit has entries to launch, made as in chapter 14: on track 4 the beat (A), the beat with sixteenth hats (B) and the hats alone (C); on track 1 two bass lines (A, B); on track 2 the chords (A). Any patterns of your own work the same way. Tap PLAY, then hold ARP: PERFORM, ARP's layer. A row for each track: its number in its colour, then its list's 16 entries, A to P, across, the way the white keys run (F3 is A, G5 is P). An entry naming a pattern shows its letter, an empty one a dot, and the entry the track is on is a tile of the track's colour. The selected track's row is a band of its colour. Under the tracks, SCN: the scenes. The header says PERFORM and the LAUNCH point, LOOP; the footer says WHITE: PATTERN, BLACK: MUTE.
-
Launch an entry
Hold ARP and tap G3, the second white key: the selected track, track 1, goes to its entry B. While playing it waits for the LAUNCH point, here the end of the track's loop: the header says T1 B AT LOOP END and B is outlined. Then B is the filled tile and the bass plays its other line. Stopped, it switches at once (LOADED T1 B); an empty entry says T1 F EMPTY. What the track had is kept as its pattern, so a launch needs no undo.
-
Keep it open
Hold HOME and tap ARP (or hold ARP and tap HOME): the layer stays open with nothing held, a lock before PERFORM in the header, and the keys and knobs act as if ARP were held. PLAY and the rest of this chapter work either way; ARP closes it.
-
Any track
ALGORITHM picks the track whose entries the white keys launch (and whose sound the knobs throw), its row the band: track 4, the drums. A3, entry C: T4 C AT LOOP END, and at the end of the loop only the hats are left.
-
When it lands
SELECT turns LAUNCH, when a launch comes in: LOOP (the default) at the end of the track's own loop, so tracks of different lengths switch at different times; BAR on the next bar; BEAT on the next beat; NOW on the next step, the playhead going on where it is. LOOP, BAR and BEAT start the pattern from its first step. The header shows it: PERFORM BAR. F3, entry A: T4 A AT NEXT BAR, and the beat is back on the bar. LAUNCH is kept with the settings.
-
Stage a mute
The black keys F♯3 G♯3 A♯3 C♯4 D♯4 F♯4 turn the mutes of tracks 1–6, staged as the entries are. G♯3: T2 MUTE AT NEXT BAR, an outlined M at the end of track 2's row; on the bar the chords drop out and the M is lit. The same key again stages the unmute, and a second press before a mute lands takes it back (T2 MUTE CANCELLED). Stopped, a mute turns at once.
-
Cancel
ALGORITHM back to track 1. F3 stages its entry A, and G♯3 the chords' unmute. OCT− before the bar drops everything staged, every track's entries and mutes: CANCELLED (NOTHING STAGED when there was nothing). The bass stays on B and the chords stay out.
-
Scenes
PRESETS turns what the white keys are, KEYS: TRACK, the selected track's entries as so far, or SCENE, the 16 scenes of the SCN row. The footer says WHITE: SCENE and SAVE + WHITE: STORE. The black keys still stage mutes.
-
Store a scene
Hold SAVE and tap F3: SCENE 1 SAVED, the entry each track is on and every track's mute, as they are now: the bass on B, the chords out. Its number is boxed on the SCN row, filled while it's the scene stored or recalled last. Storing over a kept scene asks first (OVERWRITE SCENE 1?). Then C♯4 and G♯3: on the bar the drums drop out and the chords come back.
-
Recall it
Tap F3: SCENE 1 AT NEXT BAR. Each track's entry and mute is staged for the LAUNCH point, so with BAR or BEAT they all land together: on the bar the drums come back and the chords go out. Stopped, it loads at once (LOADED SCENE 1). The scenes are kept with the project (chapter 17).
-
Throws
The four knobs throw the selected track's sound: KNOB 1 its tone (CUTOFF on most engines, PITCH on a drum kit), KNOB 2 its REVERB, KNOB 3 its DELAY and KNOB 4 its DIST. A turn pushes the value out, the card saying how far (+40), and once the knob rests it glides back over a bar: here the bass opens and closes again, then its echoes swell and fade. A throw never edits the sound and is never saved; stopping drops it at once.
-
Close it
Tap ARP: the lock closes and HOME is back. Everything launched plays on. With SONG on (chapter 14) a launch moves the track's place in its list, and the song goes on from there.
ARRANGE AND PERFORM
The FX layer
-
The FX layer
The beat from chapter 3 plays, with two chords on track 2 and a piano line on track 5. Tap PLAY, then hold FX: the FX layer, FX HOLD in the header. Its effects work on the whole mix, each while its key is held. The map shows the 14 effects of the white keys, seven a row, an octave each (F3 to E4 over F4 to E5), each cell its key's letter and the effect's icon; under them the six cuts of the black keys. The four knobs are the layer's macros. (Tapped, FX opens a track's FX pages: chapter 12.)
-
Repeat
Hold FX and hold F3: REPEAT 1/8. From the next sixteenth it takes an eighth of the music and plays it over and over until the key is let go. G3 is REPEAT 1/16 and A3 REPEAT 1/32, faster stutters (the map writes their rates 8, 16 and 32). Below 81 BPM an eighth is longer than the effects' buffer: REPEAT 1/8 and REVERSE do nothing and their cells are dim.
-
Reverse
B3: REVERSE. From the next sixteenth it takes an eighth and plays it backwards, again and again. Let go and the music goes on where it is.
-
Sweeps
C4: LPF, a low-pass that closes over a bar, the mix getting darker and darker. D4: HPF, a high-pass that opens over a bar, the bass going first.
-
Tape stop and freeze
E4: TAPE STOP, the music slowing down to a stop over a beat, as a tape machine switched off. F4: FREEZE, the sound of that moment held on, as long as the key is.
-
Octaves
G4: OCT UP, the mix an octave up beside itself. While it plays, KNOB 4 is its shimmer (SHIMR): the shifted sound fed back into itself, so each pass climbs another octave. A4: OCT DN, an octave down.
-
Gate and dub
B4: GATE, the mix chopped on the sixteenths, open for the first half of each. C5: DUB, the mix sent into the delay with its feedback turned up while the key is held; let go and the echoes ring on and fade. The delay is GLO's (chapter 13): its TIME sets their spacing.
-
Flange and vinyl
D5: FLANGE, a jet sweep, a bar each way. E5: VINYL, the wow of a record turning, a darker top and crackle. The last two white keys, F5 and G5, do nothing in the layer.
-
Stack them
Effects of different kinds stack: C4 held, then F3 with it, and the repeat goes through the closing filter. Of the ones that play back what was just heard (REPEAT, REVERSE, TAPE STOP, FREEZE, OCT UP and DN, FLANGE, VINYL) the last one pressed plays: B3 over F3 reverses, and letting B3 go returns to the repeat.
-
Cuts
The black keys F♯3 G♯3 A♯3 C♯4 D♯4 F♯4 cut tracks 1–6 while they're held: C♯4, the drums, then F♯3 and G♯3 together, the bass and the chords. A cut isn't the track's mute (GLO's, chapter 13) and is never saved.
-
Macros
The four knobs: KNOB 1 FILTER, left a low-pass, right a high-pass (here 40 LP); KNOB 2 CRUSH, fewer bits and a lower rate; KNOB 3 THROW, the mix sent into the delay and the reverb; KNOB 4 DEPTH, how much of a playback effect you hear (with OCT UP or DN its shimmer, with GATE how deep it cuts). Let go of FX and they all go back: FILTER, CRUSH and THROW to OFF, DEPTH to 100 %.
-
Latch
Hold HOME and tap FX (or hold FX and tap HOME): the layer stays open and latches, FX LATCH in the header. Now a key turns its effect on, and the same key again off, with nothing held: G4, then B4, an octave up and the gate together. The macros keep their values too. The footer says KEYS: ON / OFF.
-
All off
G4 again: its effect off. OCT− turns every effect and macro off at once: FX ALL OFF. FX closes the layer, and anything still latched with it; so do the MENU and a dialog.
YOUR SETUP
Projects and saving
-
Kept as you go
The beat from chapter 3 plays, with two chords on track 2. Nothing in Skiff has to be saved to be kept: the patterns keep themselves (chapter 14), and the whole session, the sounds and the mix too, goes into an autosave of its own, written once the music has changed, stopped, with nothing touched for 10 s (at most once a minute). Tap PLAY, then hold HOME and let it go: the MENU. ALGORITHM to SYSTEM and PRESETS to RESTORE LAST: ON, the default, so at power-on the music you left comes back and the header says RESTORED. OFF starts with the power-on sounds. Projects are for keeping versions, and starting something new.
-
Four projects
HOME closes the MENU. Tap SAVE (USER, the first time) and turn SELECT on to PROJECT, the last of SAVE's pages: four project slots, A to D, each with its name (USED when it has none); -- is an empty one. KNOB 1 is the SLOT, KNOB 2 DELETE, KNOB 3 LOAD (NEW on an empty slot), KNOB 4 SAVE: a knob turned right picks its action, OCT+ does it and OCT− drops the pick, or goes HOME. A project keeps the sounds, the mix and the effects, the tempo, the lists and the entry each track is on, SONG, the scenes, the FM6 patches, the DRUM-X kit and its name; its patterns stay in the pool, named by the lists. The unit's own settings (the MENU's, CLOCK, MIDI IN and TUNE among them) are never part of it.
-
Save it
A save writes the flash, so it waits for a stop (STOP TO SAVE): tap PLAY. KNOB 4: SAVE, and the footer says OCT+: SAVE. OCT+: the NAME screen, SAVE PROJECT A, the name empty for now. Over a used slot it asks first (OVERWRITE PROJECT A?).
-
Name it
The keys type, phone style, as for a sound (chapter 4): AB twice for B, EF for E, AB for A, TU for T: BEAT. C♯4 deletes, G♯3 is a space and D♯4 switches to digits; KNOB 1 moves along the name and KNOB 2 changes the letter there. OCT+: SAVED. Slot A says BEAT, and the boxed A in the header is the project the music now is.
-
A new project
KNOB 1 to slot B, empty, and KNOB 3 says NEW. OCT+: NEW PROJECT, the music as a new unit has it: the power-on sounds, no notes, 120 BPM. It's on no slot until it's saved. Had the music changed since its last save, it would ask first (NEW PROJECT? the music now goes). HOME: six tracks, nothing in their lanes.
-
Load
SAVE opens PROJECT again, where it was left. KNOB 1 back to A, KNOB 3: LOAD, OCT+: LOADED. A load stops the music first; PLAY, and the beat is back at 110 BPM. When the music has changed since its last save or load, LOAD asks first (LOAD PROJECT A? and its name), since what's playing would go. A load can't be undone.
-
Delete
Stopped (STOP TO DELETE otherwise), KNOB 2 one detent: DELETE; one more, NAME, renames the slot on the NAME screen. OCT+ asks first: DELETE PROJECT A?, its name, and can't be undone. OCT+ would delete it.
-
Back it up
OCT− cancels, and project A stays; PLAY starts the beat again. The four projects, the autosave, the pattern pool, your sounds and samples and the settings all live in the unit's flash. A complete backup of it all, a file on your computer, is the web editor's (chapter 19); the installer makes one too before it puts the official firmware back (chapter 1).
YOUR SETUP
Settings and themes
-
Six themes
DISPLAY's first row is THEME; turn any knob: HI-CON (high contrast), PAPER (light), CRYPT (a dungeon synth's stone, amber and pixel letters), NEON (synthwave's chrome and neon) and QUARK (particle physics), then round to SKIFF, each track in its own colour. The whole screen changes at once, the MENU first; the web editor follows the theme too. One detent back: NEON.
-
Every screen
HOME closes the MENU: NEON on HOME, a car driving the lanes' highway; GLO, the MIXER; ENV, the envelope. Each theme draws every page its own way, the graphs too: CRYPT's are ASCII art with torches and skulls, NEON's have the striped sun and the grid, QUARK's beams, collisions and calorimeter towers.
-
Large
Open the MENU again: it comes back at the tab and row it was left at. THEME two detents on, QUARK and round to SKIFF. PRESETS to LARGE, ON, and HOME: the four cards are tall, marked K1–K4, the labels larger and the values about twice the size, and the graph below becomes a strip. Lists, the piano roll, the drum grid and the layers keep their layout, with larger labels. ANIM, the next row, OFF shows every change at once: no rolling digits, no gliding piano roll, no LED sweep at power-on.
-
LEDs
In the MENU, LARGE back to OFF and PRESETS on to LEDS, how the buttons and keys glow: DIM HI, the default, lights what's active and glows the rest; DIM LO glows darker; OFF has no glow; INV lights the idle ones and darkens the active ones, as the stock firmware does. What can be pressed breathes in every mode. SCREEN OFF, below it, turns the screen and its backlight off after 5 to 60 minutes untouched (30 MIN, the default, or NEVER), never while the music plays, and the next touch only wakes it. HINTS OFF drops the hint lines and SHIFT's map.
-
Control
ALGORITHM on to CONTROL. HOLD is how long a button is held before its hold acts, 0.3 to 0.6 s (the layers, SAVE's undo, HOME's SHIFT). KNOB ACCEL ON makes a fast, steady turn move 2 to 4 steps a detent, up to 8 on wide values. BPM LOCK ON (the default) keeps SELECT for the pages and GLO + SELECT for the tempo; OFF, SELECT is the tempo everywhere. STEP PREVIEW is chapter 6's. SCALE LEDS ON: the keys of the selected track's scale glow, the root's brighter, and the others are dark: track 1 is in A minor (chapter 5), so A3, C4 and E4 are among them. Not on a drum or SLICE track.
-
Audio
ALGORITHM on to AUDIO. SPEAKER EQ: FLAT, LOWCUT or BASS+, a tone for the built-in speaker that reaches the headphones and USB audio too, so keep it FLAT to record. USB LEVEL: MASTER (the MASTER knob sets USB audio too) or FIXED. CLICK: OFF, REC (while a track is armed) or ON, a click on every beat, the bar's first higher; CLICK LEVEL its loudness. COUNT-IN: a bar or two of clicks before recording (chapter 7). TUNE: the whole unit, ±50 cents.
-
System
ALGORITHM on to SYSTEM, PRESETS down its seven rows. USB SERIAL OFF leaves out the serial console, a developer's tool, so that macOS 13–15 sees the USB audio input. RESTORE LAST is chapter 17's. CPU: 1 CORE or 2 CORES (BETA, up to 12 voices instead of 8), and how busy the audio is (0 % here: this film's run was made on a computer). CPU CLOCK: 360 MHZ or 320 MHZ. Both take effect at the next power-on: stop, then restart when the row says RESTART. CALIBRATION asks for each button and knob in turn, to learn which is which (a unit that works never needs it). RESET SETTINGS puts every MENU setting back as a new unit has it, after asking; the music stays.
-
About
On ABOUT, OCT+: SKIFF, its version (v1.3.1), the CPU's clock, a QR code to the source on GitHub, and the credits of the code it's built on, Felucca first. PRESETS scrolls them; OCT− goes back to the tabs.
-
Close it
HOME closes the MENU, from ABOUT too, and the settings are written then (while playing, at the next stop). The MIDI tab is chapter 19's.
YOUR SETUP
MIDI and the web editor
-
The MIDI tab
The beat from chapter 3 plays, with two chords on track 2. Tap PLAY, open the MENU (HOME held and let go) and turn ALGORITHM back one tab, round to MIDI, the last. Its ten rows scroll: CLOCK, where the tempo comes from (INT, its own; USB or TRS, an outside clock); MIDI IN, CH1-6 (channels 1–6 play tracks 1–6) or SEL (every channel plays the selected track); MIDI LEARN and LEARN CLEAR; T1–T6 CHANNEL. CLOCK, MIDI IN and TUNE are the unit's: loading a project never changes them.
-
Play from a keyboard
MIDI comes in over USB, where the FM-1 is a class-compliant MIDI device (no driver), or at its TRS MIDI input. With MIDI IN on CH1-6, channels 1–6 play tracks 1–6, with their velocity: here a keyboard on channel 5 plays track 5's piano over the beat (ALGORITHM to track 5 lights its notes on the keys). A track armed with REC records them as it does the keys (chapter 7). A track's own keys play out on its channel too.
-
A channel of its own
The MENU again, at the row left; PRESETS down to T4 CHANNEL and KNOB 1 to CH 10, the channel drum pads usually send on. Track 4 now hears channel 10 (and its keys play out on it), and a fill sent there plays the kit, its sounds on the General MIDI drum notes (36 kick, 38 snare, 42 closed hat …). MIDI IN says TRACK once a track has moved. Two tracks on one channel: the first of them plays it; a channel no track is on is left for other instruments.
-
MIDI LEARN
PRESETS up to MIDI LEARN, and OCT+: MIDI LEARN ON, the MENU closes and the footer says LEARN: TURN A KNOB. Turn the knob you want on a controller, on HOME, a sound's page, the MIXER or the GLO layer's levels: here track 1's KNOB 1, and the footer says T1 CUTOFF: SEND A CC. Move the controller's knob: CC21 -> T1 CUTOFF, learned. Turn the next knob for another; OCT− clears the picked one's CC.
-
It follows
OCT+: LEARN DONE. From now on CC 21 sets track 1's CUTOFF, as the knob does, the card following: the bass opens and closes. Up to 10 CCs, on any channel MIDI IN hears; a learned CC is yours, no longer the standard one's. CC 1, 6, 11, 32, 38, 64, 96–101 and 120–127 are never learned. What's learned is kept with the settings.
-
Standard CCs
Without learning anything, each track answers the standard CCs on its channel: CC 7 LEVEL, CC 10 PAN, CC 5 GLIDE, CC 73 ATTACK, CC 75 DECAY, CC 72 RELEASE, CC 74 the engine's brightness (ANALOG's CUTOFF …), CC 71 its resonance, CC 91 REVERB, CC 93 CHORUS and CC 94 DELAY; CC 1 (the mod wheel) and CC 11 (expression) are MOD sources (chapter 9), and CC 64 is sustain. GLO, the MIXER: CC 7 on channel 2 takes track 2's fader down and back. Into an armed track, they're recorded as automation.
-
Program Change
HOME. A Program Change on a track's channel loads its engine's sound of that number, counted from 0: 0 on channel 2, and track 2, on FM6, plays TINE EP, FM6's first.
-
Learn clear
The MENU again, at MIDI LEARN's row; PRESETS down to LEARN CLEAR: 1 CC. OCT+: LEARN CLEARED, every learned CC forgotten (NOTHING LEARNED when there was none). RESET SETTINGS (chapter 18) clears them too.
- Sound: every parameter of the selected track. 6-OP FM: an FM6 track's whole patch, six operators
(chapter 11), with
.syxSysEx files imported and exported. - Sequencer, Song and Mixer: the steps; each track's list, the scenes and the pattern pool (chapter 14); the six strips.
- Library: sounds kept on the computer, dragged to and from the unit's 32 user slots.
- Samples: your own samples for USR1–3 (chapter 10), from a file or recorded from an input, trimmed on the waveform.
- Projects: the four projects and their names (chapter 17), and the complete backup: the music now, projects A–D, the sounds, your samples and the settings in one file on the computer, restored the same way.
- Settings: the MENU's settings (chapter 18).
Glossary
- Track
- One of six parts, T1–T6, each with its own sound and pattern, all playing together. ALGORITHM picks the track you're working on.
- Engine
- How a track makes its sound. There are 14: ANALOG, FM6, PHASE, LOFI, SAMPLE, VOICE, TRIO, WHEEL, GRAIN, PHYS, NOISE, SLICE, DRUM and DRUM-X. Hold EDIT to switch.
- Sound
- A stored setting of an engine (a preset). PRESETS steps through them; your own go to SAVE › USER.
- Page family
- The pages one button opens: tap it again, or turn SELECT, for the next. SEQ's family is STEP, ROLL, CHANCE, PLAY, PATTERN, AUTOMATION and SONG.
- Layer
- What a held button lays over the page: FX, GLO, SEL, EDIT, SEQ TOOLS, PERFORM (ARP) and REC (SHIFT + REC). Let go and it's gone; SHIFT + the button keeps it open.
- SHIFT
- HOME held. Its map shows what every control does on the page, and it changes what some do: SHIFT + SAVE is TAKE.
- Step
- A sixteenth of a bar in a pattern, up to 64 of them. On the step pages the 16 white keys are steps 1–16.
- Pattern
- A track's notes exactly as they play: its steps, LENGTH, DIV, SWING, GATE, direction, automation and locks. Kept by itself; 64 of them in a pool every project shares.
- List and entry
- Each track has a list of 16 entries, A–P. An entry names a pattern and how many times it plays (REPS). The lists are the song, and PERFORM's keys.
- Lock
- A step's own value for a control: hold the step and turn a knob.
- Take
- SHIFT + SAVE keeps the loop you just played as the track's pattern, whether or not REC was on.
- Scene
- The entry every track is on and every mute, stored together (16 in a project) and recalled with one key in PERFORM.
- Project
- The sounds, the lists, the scenes and the settings of a piece of music. There are four; the patterns themselves live in the pool.
- Undo
- Hold SAVE. Eight changes are kept; OCT− goes further back and OCT+ redoes while the box shows.
If the FM-1 does not start
If an update is interrupted and the FM-1 stays black, check whether a computer sees it as a USB device named WL80UBOOT (or a USB mass-storage device with ID 4C4A:8057). That is the chip's built-in boot mode, and the FM-1 can be brought back:
- First try another USB data cable and close every other app that uses MIDI, then run the installer again: it finishes an interrupted update.
- If it stays in boot mode, FM-1 Transporter reads and writes the FM-1's flash from a Mac through a Seeed XIAO RP2040 (three wires to the FM-1's USB lines). Back up the flash first, then write the official firmware.
Anything else: open an issue on GitHub.
Quick reference
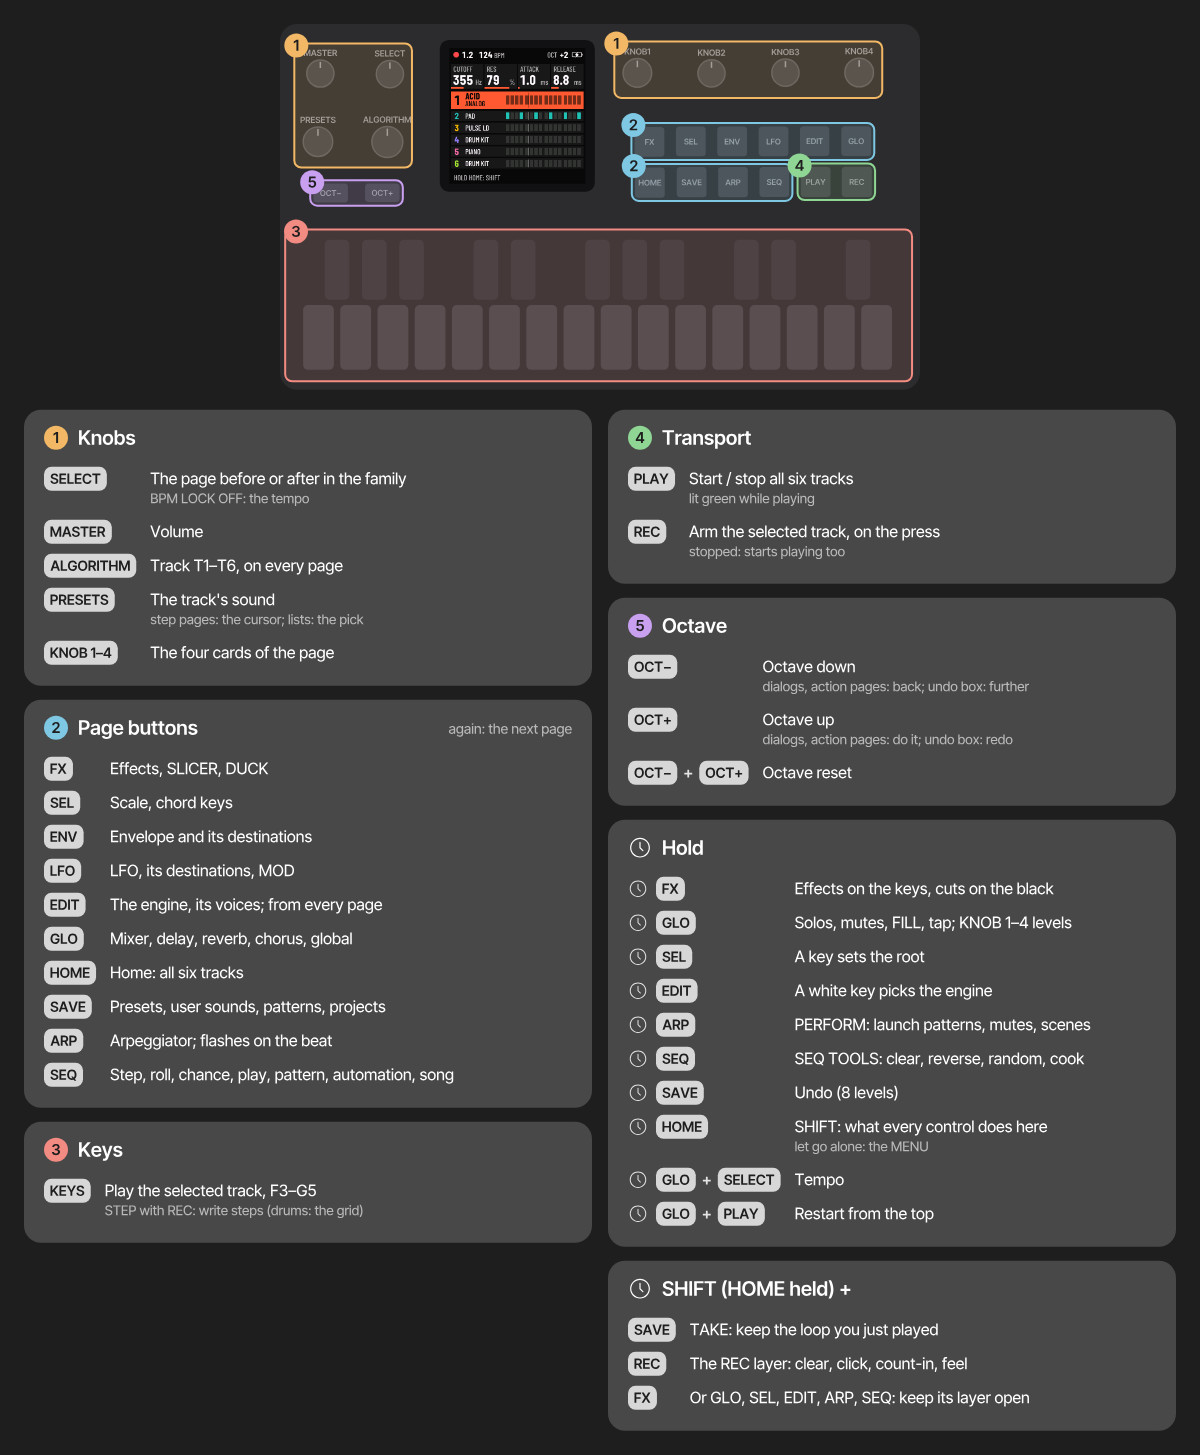
| Control | What it does | Shown in |
|---|---|---|
| MASTER | The volume. | |
| SELECT | The page before or after in the family. With GLO held: the tempo. | |
| ALGORITHM | The track, T1–T6, on every page. In the MENU: the tab. | |
| PRESETS | The track's sound. On the step pages: the cursor. In lists: the row. | |
| KNOB 1–KNOB 4 | The four cards across the top of the page. | |
| FX | Tap: the track's effects, SLICER and DUCK. Hold: the FX layer. | |
| SEL | Tap: SCALE and CHORD. Hold: a key sets the root. | |
| ENV | The envelopes and where they go. | |
| LFO | Tap: the LFOs and MOD. Hold: MOMENTARY. | |
| EDIT | Tap: the engine's pages and the voices. Hold: the engines on the white keys. | |
| GLO | Tap: MIXER, DELAY, REVERB, CHORUS, GLOBAL. Hold: solos, mutes, FILL, tap tempo. | |
| HOME | Tap: HOME. Hold: SHIFT and its map. Held and let go alone: the MENU. | |
| SAVE | Tap: PRESETS, USER, PATTERNS, PROJECT. Hold: undo. SHIFT + SAVE: TAKE. | |
| ARP | Tap: the arpeggiator. Hold: PERFORM. | |
| SEQ | Tap: STEP, ROLL, CHANCE, PLAY, PATTERN, AUTOMATION, SONG. Hold: SEQ TOOLS. | |
| PLAY | Start and stop; green while playing. With GLO held: from the top. | |
| REC | Arms the selected track. SHIFT + REC: the REC layer. | |
| OCT− OCT+ | The octave; both together reset it. In dialogs: back, and do it. | |
| The keys | F3–G5: notes. On the step pages the white keys are steps 1–16; on a drum grid the black keys pick the row. |